Message组件

Message 组件常用于主动操作后的反馈提示。下面是效果图
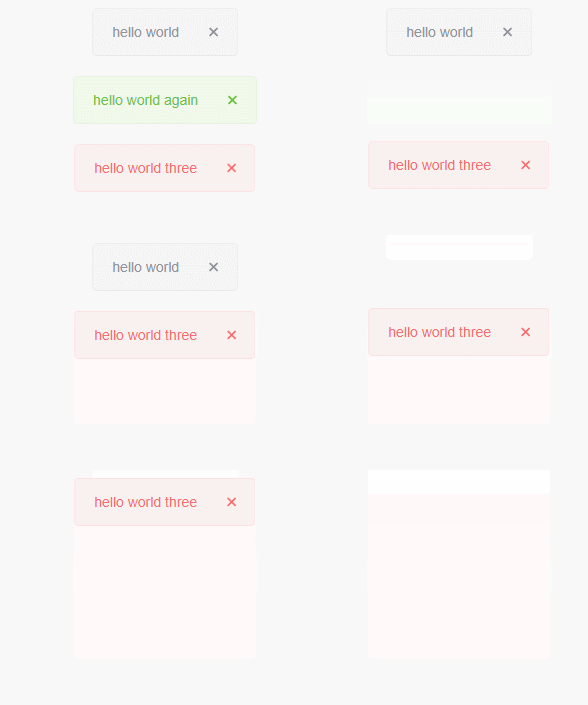
Message组件效果动图

看完了效果图以后,我们再来看看看如何在页面中使用我们的Message组件。

1
2
3
4
5
6
7
8
9
10
<template>
<TmButton @click="open">打开Message组件</TmButton>
</template>
<script lang="ts" setup>
import TmButton from '@/components/Button/Button.vue'
import { CreateMessage } from '@/components/Message/method.ts'
const open = () => {
CreateMessage({ message: 'hello world', duration: 0, showClose: true })
}
</script>

需求分析

Message 组件属性和方法
看完了上面的效果图以及调用Message组件的方式以后,我们来分析一下它可能具备哪些属性和方法。我写了以下几个属性、方法:

  • message 提示信息
  • duration 延时关闭提示框的时间,如果为 0 则需要手动关闭
  • showClose 是否显示关闭按钮
  • transitionName 过渡动画的名称
  • id 每一个 Message 组件实例的id
  • zIndex 每一个 Message 组件实例的zIndex
  • onDestory 每一个 Message 组件实例的销毁函数 从body中移除自己的 DOM
  • type 类型 不同的类型有不同的css风格

如何挂载和销毁
组件写好了,我们如何挂载到页面的<body></body>的内容中去,同时还要思考在用户点击了关闭按钮或者自动关闭以后如何从<body></body>中移除自身。在 vue 中提供了createApprender两个函数,createApp有些重量了,因为它返回的是一个应用;而我们这里只是需要将我们写好的组件挂载到页面中去。所以选择使用render这个函数。 销毁自身的话可以调用组件内部的方法,实际上就是将控制组件显示、隐藏的变量visible设置为 false。然后再调用render将其相关的dom
body中去除。

如何获取组件实例信息
通过效果图我们可以看出,Message组件之间是有一定距离的,这样显示的时候不会重叠在一起;那么我们就要思考如何在创建Message组件的时候让它移动一定的偏移量。那么我们就要拿到Message组件的实例信息。所以我们给每一个Message组件赋一个唯一的id,通过id找到对应的组件实例。在编写组件的时候,通过defineExpose向外导出需要用到的属性。比如组件底部的偏移量bottomOffset和控制组件显示、隐藏的visible

如何添加动画效果
Vue中,添加动画使用<Transition></Transition>标签。监听@afterLeave@enter两个事件。在动画结束以后注销实例,在动画进入以后更新一下组件的高度,从而实现对应的css样式,避免Message组件之间重叠。

代码实现

在对Message组件进行了一系列的分析之后,终于可以开始写代码了。我的思路是这样的:

  • 第一步,我先实现一个Message组件的基本结构。
  • 第二步,实现CreateMessage方法,可以将我们第一步写好的基本结构展示在页面上。
  • 第三步,拿到组件实例信息,可以销毁自身。
  • 第四步,当有多个Message组件在页面上的时候计算每一个组件的位置,使他们不重叠。
  • 第五步,给Message组件添加动画效果。

编写组件基本结构

属性和方法

1
2
3
4
5
6
7
8
9
10
11
12
import { type VNode } from 'vue'
export interface MessageProps {
message?: string | VNode
duration?: number
showClose?: boolean
type?: 'success' | 'info' | 'warning' | 'danger'
offset?: number
id: string
zIndex: number
transitionName?: string
onDestory: () => void
}

基本结构

1
2
3
4
5
6
7
8
9
10
11
12
13
14
15
16
17
18
19
20
21
22
23
24
25
26
27
28
29
30
31
32
33
34
35
36
37
38
39
40
41
42
43
44
<template>
<div
class="tm-message"
v-show="visible"
:class="{[`tm-message--${type}`]: type, 'is-close': showClose}">
<!-- 内容区域 -->
<div class="tm-message__content">
<slot>
<RenderVnode :vNode="message" v-if="message" />
</slot>
</div>
<!-- icon图标 -->
<div class="tm-message__close" v-if="showClose">
<Icon icon="xmark" @click.stop="visible = false" />
</div>
</div>
</template>

<script lang="ts" setup>
import { onMounted, ref, watch } from 'vue'
import Icon from '../Icon/Icon.vue'
import { MessageProps } from './types'
import RenderVnode from '../Common/RenderVnode'
// 默认配置
const props = withDefaults(defineProps<MessageProps>(), {
type: 'info',
duration: 3000
})
// 通过visible变量来控制组件显示隐藏
const visible = ref(false)
let timer: any
// 如果外部传入了duration 那么就在一定的时间内隐藏
function startTimer() {
if (props.duration === 0) return
timer = setTimeout(() => {
visible.value = false
}, props.duration)
}
// 页面挂载以后默认显示,然后执行startTimer函数进行倒计时隐藏
onMounted(() => {
visible.value = true
startTimer()
})
</script>

编写 CreateMessage 方法

1
2
3
4
5
6
7
8
9
10
11
12
13
14
15
16
import { render, h } from 'vue'
import type { CreateMessageProps, MessageProps } from './types'
import MessageConstructor from './Message.vue'

export const createMessage = (props: MessageProps) => {
// 创建一个dom节点
const container = document.createElement('div')
// 创建一个vnode
const vnode = h(MessageConstructor, props)
// 渲染
render(vnode, container)
// firstElementChild是一个可能为null的联合类型
// appendChild接受一个element类型
// firstElementChild! 非空断言操作符告诉ts它不会为空
document.body.appendChild(container.firstElementChild!)
}
1
2
3
4
5
6
7
8
<script lang="ts" setup>
import { createMessage } from './components/Message/method'
import { onMounted } from 'vue'
onMounted(() => {
createMessage({ message: 'hello world', duration: 0 })
createMessage({ message: 'hello world' })
})
</script>

获取实例信息、销毁自身

组件是挂载了,但是当它隐藏以后并没有从body中消除,通过浏览器开发者工具我们可以清楚的看到它还存在于页面中。我们应该在它隐藏以后,将它从body中去除。

1
export type CreateMessageProps = Omit<MessageProps, 'onDestory' | 'id'>
1
2
3
4
5
6
7
8
9
10
11
12
13
14
15
16
17
18
19
20
21
22
23
24
25
26
27
28
29
30
31
32
33
34
35
36
37
38
39
40
41
42
43
44
45
46
47
48
49
50
51
52
53
54
55
56
import { render, h, shallowReactive } from 'vue'
import type { CreateMessageProps } from './types'
import MessageConstructor from './Message.vue'
let seed = 1
const instances: MessageContext[] = shallowReactive([])
export const createMessage = (props: CreateMessageProps) => {
const id = `message_${seed++}`
// 创建一个dom节点
const container = document.createElement('div')
// 从dom中注销掉
const destory = () => {
const idx = instances.findIndex((instance) => instance.id === id)
if (idx === -1) return
instances.splice(idx, 1)
render(null, container)
}
// 手动调用删除
const manualDestory = () => {
const instance = instances.find((instance) => instance.id === id)
if (instance) {
instance.vm.exposed!.visible.value = false
}
}
const newProps = {
...props,
id,
onDestory: destory
}
// 创建一个vnode
const vnode = h(MessageConstructor, newProps)
render(vnode, container)
// firstElementChild是一个可能为null的联合类型
// appendChild接受一个element类型
// firstElementChild! 非空断言操作符告诉ts它不会为空
document.body.appendChild(container.firstElementChild!)
const vm = vnode.component!
const instance = {
id,
vnode,
vm,
props: newProps,
destory: manualDestory
}
instances.push(instance)
return instance
}

export const getLastInstance = () => {
return instances.at(-1)
}

export const closeAll = () => {
instances.forEach((instance) => {
instance.destory()
})
}

计算位置,添加 Css 样式

1
2
3
4
5
6
7
8
9
10
11
12
13
14
15
16
17
18
19
20
21
22
23
24
25
26
27
28
29
30
31
32
33
34
35
36
37
38
39
40
41
42
43
44
45
46
47
48
49
50
51
52
53
54
55
56
57
58
59
60
61
62
63
64
65
66
67
68
69
70
<template>
<div
class="tm-message"
v-show="visible"
:class="{ [`tm-message--${type}`]: type, 'is-close': showClose }"
ref="messageRef"
:style="cssStyle"
role="alert"
@mouseenter="clearTimer"
@mouseleave="startTimer">
<div class="tm-message__content">
<slot>
<RenderVnode :vNode="message" v-if="message" />
</slot>
</div>
<div class="tm-message__close" v-if="showClose">
<Icon icon="xmark" @click.stop="visible = false" />
</div>
</div>
</template>

<script setup lang="ts">
import { computed, onMounted, ref, watch, nextTick } from 'vue'
import Icon from '../Icon/Icon.vue'
import { type MessageProps } from './types'
import RenderVnode from '../Common/RenderVnode'
import { getLastBottomOffset } from './method'
import useEventListener from '../../hooks/usEventListener'
const props = withDefaults(defineProps<MessageProps>(), {
type: 'info',
duration: 3000,
offset: 20,
transitionName: 'fade-up'
})
const visible = ref(false)
const messageRef = ref<HTMLDivElement>()
const height = ref(0)
// 上一个实例的底部
const lastOffset = computed(() => getLastBottomOffset(props.id))
// 这个实例的顶部 中间是我们传递的offset偏移量
const topOffset = computed(() => props.offset + lastOffset.value)
// 这个实例的底部 等于我这个实例的高度 + 顶部(从上边框往下走了一个高度的距离就是我的底部)
const bottomOffset = computed(() => height.value + topOffset.value)
// 然后我们给它写css样式,让它定位到topOffset
const cssStyle = computed(() => ({
top: topOffset.value + 'px',
zIndex: props.zIndex
}))
let timer: any
function startTimer() {
if (props.duration === 0) return
timer = setTimeout(() => {
visible.value = false
}, props.duration)
}
function clearTimer() {
clearTimeout(timer)
}
onMounted(async () => {
visible.value = true
startTimer()
await nextTick()
height.value = messageRef.value!.getBoundingClientRect().height
})

defineExpose({
bottomOffset,
visible
})
</script>
1
2
3
4
5
6
7
8
9
10
11
12
13
14
15
16
17
18
19
20
21
import { computed, ref } from 'vue'

const zIndex = ref(0)
const useZIndex = (initialValue = 2000) => {
const initialZIndex = ref(initialValue)
// 计算出当前实例的z-index值 0 + 2000
const currentIndex = computed(() => zIndex.value + initialZIndex.value)
const nextZIndex = () => {
// zIndex + 1
zIndex.value++
// zIndex 发生变化的时候 currentIndex也就发生了变化 从 2000变成了 2001
return currentIndex.value
}
return {
currentIndex,
nextZIndex,
initialZIndex
}
}

export default useZIndex
1
2
3
4
5
6
7
8
9
10
11
12
13
14
15
16
17
18
19
20
21
22
23
24
25
26
27
28
29
30
31
32
33
34
35
36
37
38
39
40
41
42
43
44
45
46
47
48
49
50
51
52
53
54
55
56
57
58
import { render, h, shallowReactive } from 'vue'
import type { CreateMessageProps, MessageContext } from './types'
import MessageConstructor from './Message.vue'
import useZIndex from '../../hooks/useZIndex'
let seed = 1
const instances: MessageContext[] = shallowReactive([])
export const createMessage = (props: CreateMessageProps) => {
const { nextZIndex } = useZIndex()
const id = `message_${seed++}`
// 创建一个dom节点
const container = document.createElement('div')
const destory = () => {
const idx = instances.findIndex((instance) => instance.id === id)
if (idx === -1) return
instances.splice(idx, 1)
render(null, container)
}
// 手动调用删除
const manualDestory = () => {
const instance = instances.find((instance) => instance.id === id)
if (instance) {
instance.vm.exposed!.visible.value = false
}
}
const newProps = {
...props,
id,
zIndex: nextZIndex(),
onDestory: destory
}
// 创建一个vnode
const vnode = h(MessageConstructor, newProps)
render(vnode, container)
// firstElementChild是一个可能为null的联合类型
// appendChild接受一个element类型
// firstElementChild! 非空断言操作符告诉ts它不会为空
document.body.appendChild(container.firstElementChild!)
const vm = vnode.component!
const instance = {
id,
vnode,
vm,
props: newProps,
destory: manualDestory
}
instances.push(instance)
return instance
}

export const getLastBottomOffset = (id: string) => {
const idx = instances.findIndex((instance) => instance.id === id)
if (idx <= 0) {
return 0
} else {
const prev = instances[idx - 1]
return prev.vm.exposed!.bottomOffset.value
}
}

添加动画效果并且监听事件

1
2
3
4
5
6
7
8
9
10
11
12
13
14
15
16
17
18
19
20
21
22
23
24
25
26
27
28
29
30
31
32
33
34
35
36
37
38
39
40
41
42
43
44
45
46
47
48
49
50
51
52
53
54
55
56
57
58
59
60
61
62
63
64
65
66
67
68
69
70
71
72
73
74
75
76
77
78
79
80
81
<template>
<Transition
:name="transitionName"
@afterLeave="destoryComponent"
@enter="updateHeight">
<div
class="tm-message"
v-show="visible"
:class="{ [`tm-message--${type}`]: type, 'is-close': showClose }"
ref="messageRef"
:style="cssStyle"
role="alert"
@mouseenter="clearTimer"
@mouseleave="startTimer">
<div class="tm-message__content">
<slot>
<RenderVnode :vNode="message" v-if="message" />
</slot>
</div>
<div class="tm-message__close" v-if="showClose">
<Icon icon="xmark" @click.stop="visible = false" />
</div>
</div>
</Transition>
</template>

<script setup lang="ts">
import { computed, onMounted, ref, watch, nextTick } from 'vue'
import Icon from '../Icon/Icon.vue'
import { type MessageProps } from './types'
import RenderVnode from '../Common/RenderVnode'
import { getLastBottomOffset } from './method'
import useEventListener from '../../hooks/usEventListener'
const props = withDefaults(defineProps<MessageProps>(), {
type: 'info',
duration: 3000,
offset: 20,
transitionName: 'fade-up'
})
const visible = ref(false)
const messageRef = ref<HTMLDivElement>()
const height = ref(0)
// 上一个实例的底部
const lastOffset = computed(() => getLastBottomOffset(props.id))
// 这个实例的顶部 中间是我们传递的offset偏移量
const topOffset = computed(() => props.offset + lastOffset.value)
// 这个实例的底部 等于我这个实例的高度 + 顶部(从上边框往下走了一个高度的距离就是我的底部)
const bottomOffset = computed(() => height.value + topOffset.value)
// 然后我们给它写css样式,让它定位到topOffset
const cssStyle = computed(() => ({
top: topOffset.value + 'px',
zIndex: props.zIndex
}))
let timer: any
function startTimer() {
if (props.duration === 0) return
timer = setTimeout(() => {
visible.value = false
}, props.duration)
}
function clearTimer() {
clearTimeout(timer)
}
onMounted(async () => {
visible.value = true
startTimer()
})

function destoryComponent() {
props.onDestory()
}

function updateHeight() {
height.value = messageRef.value!.getBoundingClientRect().height
}

defineExpose({
bottomOffset,
visible
})
</script>